Repairing a Panasonic Smart Toilet Seat

Recently, one of my smart toilet seats malfunctioned. On the control panel, only the water temperature button responded, while all other buttons were unresponsive. Even after restarting the power, there was no change. My intuition told me this wasn't a single issue but multiple problems occurring simultaneously. So, I spent a few hours in the evening carefully examining the product.
Symptoms of the Malfunction
This Panasonic EKS09 smart toilet seat was purchased in 2019, nearly six years ago, which is beyond its five-year warranty. The options were either to repair it myself or replace it entirely.
Considering that the two toilet seats I bought afterward generally had high water pressure, while this Panasonic model offers a gentler flush and is mainly used by my child, my first instinct was to try repairing it.
Previously, this toilet seat had experienced button unresponsiveness, where all buttons stopped working at one point but miraculously started working again the next day. This was likely due to poor contact or corrosion on the ribbon cable board.
This time, the issue was more complicated.
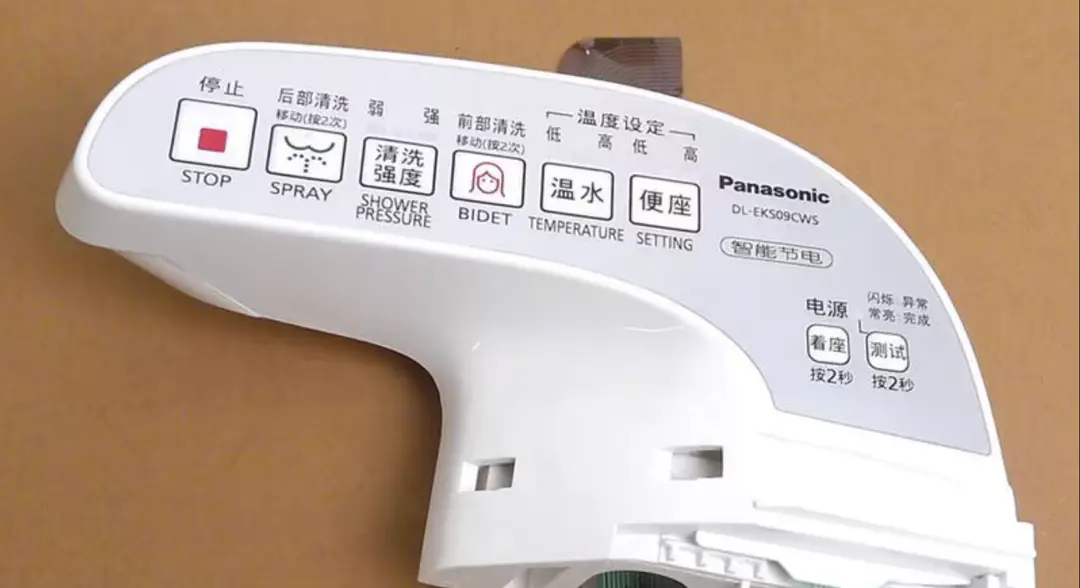
On the control panel with eight buttons, only one of the six functional control buttons—the water temperature button—responded. As for the test button, holding it down caused the light to stay on, but it didn't enter test mode. Moreover, there was no way to exit the test mode. The seat sensor and lighting functioned normally.
After turning the power off and on again, only the motor's humming sound was heard, but no water came out, and the wash wand didn't extend.
Troubleshooting and Repair Process
Since I had no prior experience with the internal structure of a smart toilet seat, my intuition suggested two potential issues:
- Malfunctioning control panel.
- A faulty or clogged wash wand motor.
Mainboard
Disassembling the toilet seat's outer shell was relatively straightforward. Essentially, it involved removing screws and applying a bit of force to take it apart. However, identifying the root cause required more effort.
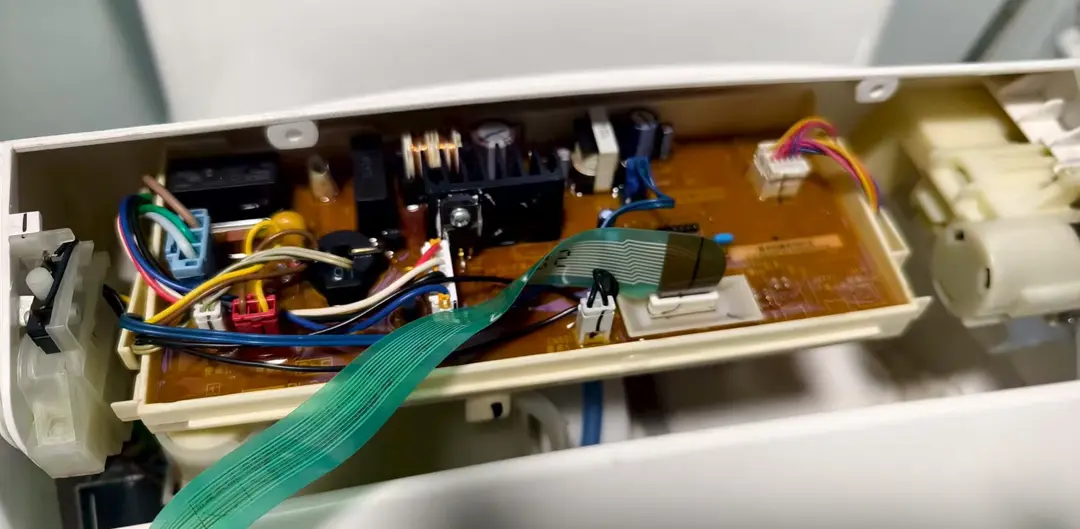
First, I visually inspected the entire mainboard and found it had been waterproofed. There were no signs of burnt components. This observation aligned with the fact that the water temperature button still worked and the motor hummed when powered on, suggesting no major functional issues.
Wash Wand
Next, I focused on studying the structure of the wash wand.
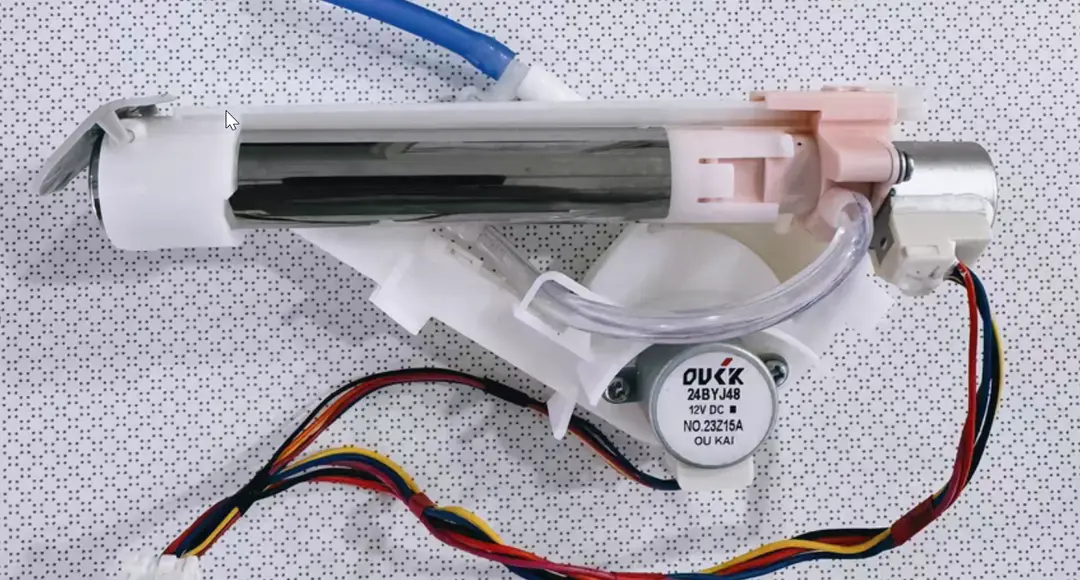
The wash wand is controlled by two motors. The blue tube supplies water, while the white tube delivers it to the wash wand.
Initially, I misunderstood its mechanism, thinking the motor at the end of the wash wand controlled its extension and retraction, while the motor at the triangular position handled water pumping.
Later, I learned that the motor at the end of the wash wand only acts as a rotary switch to control the valve, while the motor at the triangular position manages the extension and retraction.
However, after removing both motors, I found no apparent issues.
When the device was powered on, the end motor operated normally. After manually pulling out the wash wand, the triangular motor successfully retracted it.
This indicated that the motors themselves were likely fine. The puzzling part was that the wash wand refused to extend automatically during testing.
I began to suspect that the extension mechanism inside the wand was faulty—only capable of retracting but not extending.
Unfortunately, this component seemed impossible to disassemble. After removing the motors, the entire plastic structure appeared to be molded as one piece.
Another possibility emerged during testing: the blue tube wasn't delivering water either.
This was strange.
If the issue were with the wash wand, it would mean water was trapped inside. But if the blue tube also wasn't delivering water, the problem likely lay further upstream, not with the wand itself.
Of course, it was also possible that the wash wand was damaged, which would complicate the situation further.
Hot Water Tank
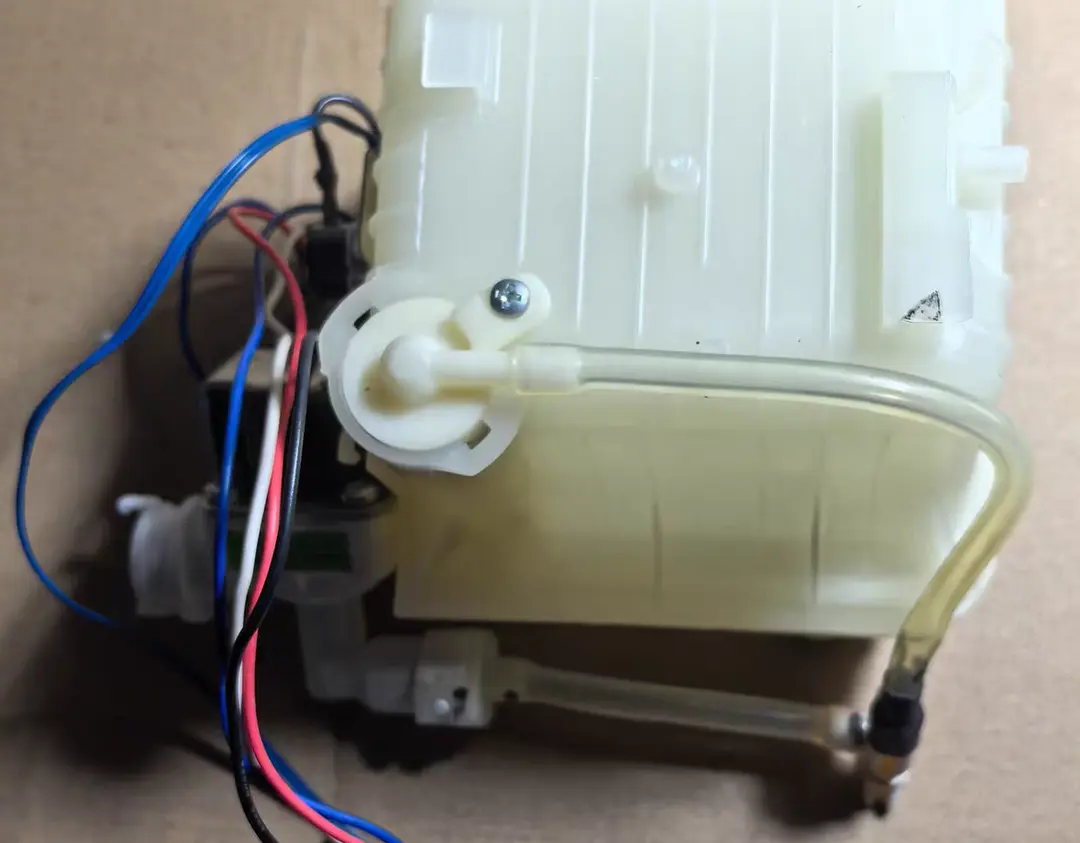
Next, I shifted my focus to the water pathway leading to the blue tube.
The water pathway is relatively simple: a solenoid valve at the bottom left controls the water intake. The valve has two outlets—one directly connects to the hot water tank, while the other, at the bottom, links to a pressure relief valve that discharges excess water through a transparent tube when the pressure is too high. When the tank is full, water also drains through the transparent tube at the bottom. The outlet on the right side of the tank connects to the wash wand via the blue tube.
Using my phone's flashlight, I inspected the hot water tank and found no signs of sediment. Both the blue and transparent tubes showed no blockages, suggesting the water pathway from the tank was clear.
This led me to focus on the solenoid valve at the front end.
Solenoid Valve

This solenoid valve connects to the water inlet on the left and is fixed to the tank's bottom interface on the right, making it the core of the water pathway.
However, disassembling it was challenging. All four screws faced inward, and the side was blocked by the toilet seat. To access it, I'd either have to remove the hot water tank or the seat. Given the seat's waterproof design, removing it was extremely difficult. Ultimately, I had no choice but to remove the hot water tank.
Fortunately, the hot water tank was secured by only one screw. The main complication was that the tank's top was crowded with the mainboard and tangled wires, making it hard to pull out.
In the end, I leveraged the flexibility of the plastic casing, forcibly twisting the shell to disassemble it.
After removing the solenoid valve, I inspected it and found nothing obviously wrong, aside from a thin layer of white scale on the black rubber seal.
I reassembled it, and to my surprise, when I powered it on, water started flowing from the outlet.
I was thrilled, thinking the problem was completely resolved. I immediately turned off the power and water supply to fix the control panel's ribbon cable.
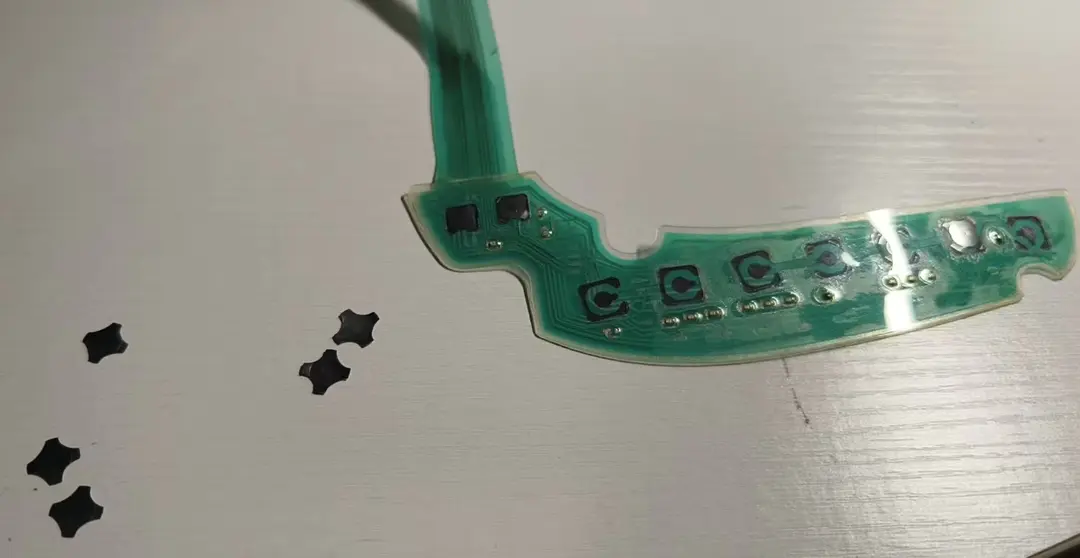
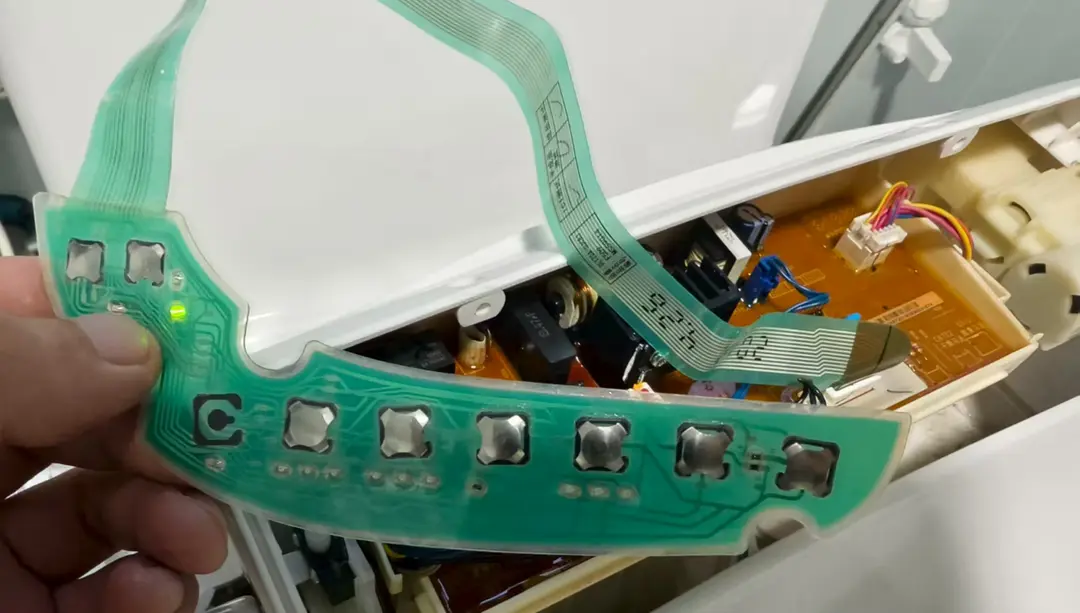
Ribbon Cable Board
Earlier, to test the button functions, I had already disassembled the control panel. I even forcibly peeled off the glued ribbon cable, suspecting a short circuit, and tested each button individually after removing them.
After reassembling the ribbon cable board and reconnecting it to the mainboard, I restored power and water supply—only to be stunned.
While the buttons on the ribbon cable board could now control the wash wand's water output, and the moment the nozzle sprayed water brought me immense relief, the outlet kept leaking water.
Upon closer inspection, the water seemed to be leaking from the pressure relief valve behind the solenoid valve.
Solenoid Valve Installation
Could I have damaged the solenoid valve during disassembly?
Considering the high water pressure at home, which also caused the pressure relief valve on my electric water heater to drip constantly, could excessive water pressure be the culprit?
Alternatively, perhaps the solenoid valve wasn't installed correctly, and its components needed to be positioned at a specific angle?
Refusing to give up, I researched the solenoid valve's mechanism online.
It turned out to be quite simple: an electromagnetic mechanism controls a metal rod inside the valve. When the rod is lifted, the valve opens; when it drops, the valve closes. A small spring behind the rod ensures it presses against the valve outlet.
That's right—the metal rod.
I recalled that during reassembly, I hadn't seen this component.
I disassembled the solenoid valve again and confirmed the metal rod was missing.
I searched every corner of the bathroom floor but found nothing.
Finally, I shook the toilet seat and heard something rattling inside—likely the missing part.
After removing the hot water tank, sure enough, a small metal rod with a rubber tip was lying deep inside the casing.
It must have been accidentally launched by the spring when I first disassembled the solenoid valve. At the time, I hadn't noticed it, assuming the solenoid valve contained only plastic and rubber components.
In the end, after inserting the metal rod back into the solenoid valve and reinstalling everything, the outlet stopped leaking abnormally.
Aside from the originally unresponsive buttons, the remaining controls on the panel functioned normally.
The problem was finally resolved.
Conclusion
I hadn't held high hopes for this repair initially, primarily because the issue wasn't a single fault but a combination of multiple problems, making troubleshooting and localization challenging.
Coupled with my lack of prior experience, I took many detours during the process. At one point, I considered giving up and even thought about cutting the ribbon cable from the end, testing it segment by segment. Since it was already broken, I felt compelled to figure it out, if only to justify my efforts.
During disassembly, I sometimes resorted to brute force. Fortunately, the product was quite sturdy. For instance, when removing the solenoid valve, its two connectors were stuck on the hot water tank's heating element接头, but they remained intact despite repeated pulling. The ribbon cable interface endured dozens of insertions and removals without failing. Similarly, all the connectors on the mainboard withstood repeated tugging during disassembly without breaking—a testament to its durability.
Through this repair, I've gained a preliminary understanding of the smart toilet seat's structure and now have a clearer grasp of its components and functionalities. If I encounter similar issues in the future, it'll be much easier to handle.
Additionally, while disassembling the control panel, I noticed room for improvement in its waterproofing. Upon opening the panel, I found yellowish water stains beneath the ribbon cable switches, likely caused by water seepage or condensation. Over time, this corrosion could easily lead to button failures.
After browsing Taobao, I found that replacing the control panel is quite common, but it's not cheap. A plastic part with a ribbon switch costs around 120 RMB, while third-party DIY ribbon cables are about 70 RMB. It doesn't feel worth the price. For now, I'll continue using it and might check second-hand options on Xianyu later.
In summary, for an electronic product that's already been in use for five years, I don't expect it to last much longer. Eventually, it will need replacement. However, I've been particularly frustrated with JD.com lately. Every time I look at an electronic product, multiple prices are displayed, with the "national subsidy" price being 15%–20% cheaper than the listed price. It gives the impression that anyone not using the subsidy is being ripped off. But upon checking the subsidy eligibility, I found it's only available in two provinces nationwide—utterly irritating.