Feiniu NAS, like Synology, comes with built-in system-level intranet penetration functionality. Over the years, I’ve used Synology’s QuickConnect to access my home NAS. Although the speed is slow, as the industry leader, Synology’s service security is relatively reassuring. However, I have some reservations about Feiniu, so I had to configure external network access myself. At the same time, I aimed to strike a balance between usability and security through firewall settings and certain rules. This article mainly explains the reasons for my choice and the configuration plan.
Why Not Use Feiniu FN Connect
Privacy and Security Concerns
As I mentioned in my previous article, “Should Feiniu OS Be Installed on Physical Machines or Virtual Machines?”, Feiniu is still a startup with just over 20 employees. From a rational perspective, I might not need to entrust all my privacy to it.
In comparison, Synology is a global enterprise, ranked first in the industry, and is much more reassuring in terms of data security.
Although this might seem biased, it’s a necessary choice.
Moreover, even Synology isn’t entirely reliable. For example, there’s a Synology DS1618+ in my office’s server room. For data security reasons, external network connections have never been enabled, let alone using QuickConnect for remote access. All data is stored solely within the intranet.
Personal Information Security
From a technical perspective, stealing data from a user’s NAS used to be quite difficult.
I believe that even if Synology were to steal user data, it couldn’t take all the files at once. The massive amount of data transfer would inevitably alert users, making the risk too high.
If they were to “steal data,” they would likely target high-value information. The recent rise of AI recognition features provides an excellent opportunity for such activities.
By setting targeted keywords, they could “steal” small amounts of user data to maximize “gains.”
Previously, Synology’s low performance made me think it would be difficult for them to employ such methods. Later, due to my NAS’s weak performance, I directly turned off the AI image recognition feature.
Currently, various domestic NAS brands (such as UGREEN, ZSpace, etc.) or image software (like Immich, MT Photos, Feiniu Photos, etc.) all incorporate more powerful AI models, undoubtedly enabling more accurate recognition of users’ important private data.
For instance, suppose there’s an internal control issue at one of these companies, and a programmer with gambling debts wants to steal credit card data from users’ NAS-stored photos for black market sales.
In this case, the programmer would only need to steal a mere 0.2KB of data from the user’s device to achieve their goal.
| |
With such data and modern encryption techniques, ordinary users would have no way of detecting it. Even if the programmer were caught through other channels later, investigative authorities would find it challenging to handle.
Disclaimer: The above content is purely speculative and does not represent real-world occurrences.
Transmission Speed
Feiniu Connect provides users with a free penetration solution by default. Actual tests show a bandwidth of about 2-4Mbps, which translates to a download speed of 200-500KB/s, similar to Synology’s QuickConnect.
Additionally, Feiniu offers a paid version of Connect at a relatively affordable price, which can increase speeds to 12Mbps or even 40Mbps. The 40Mbps option nearly reaches the upload speed limit for most home broadband users.
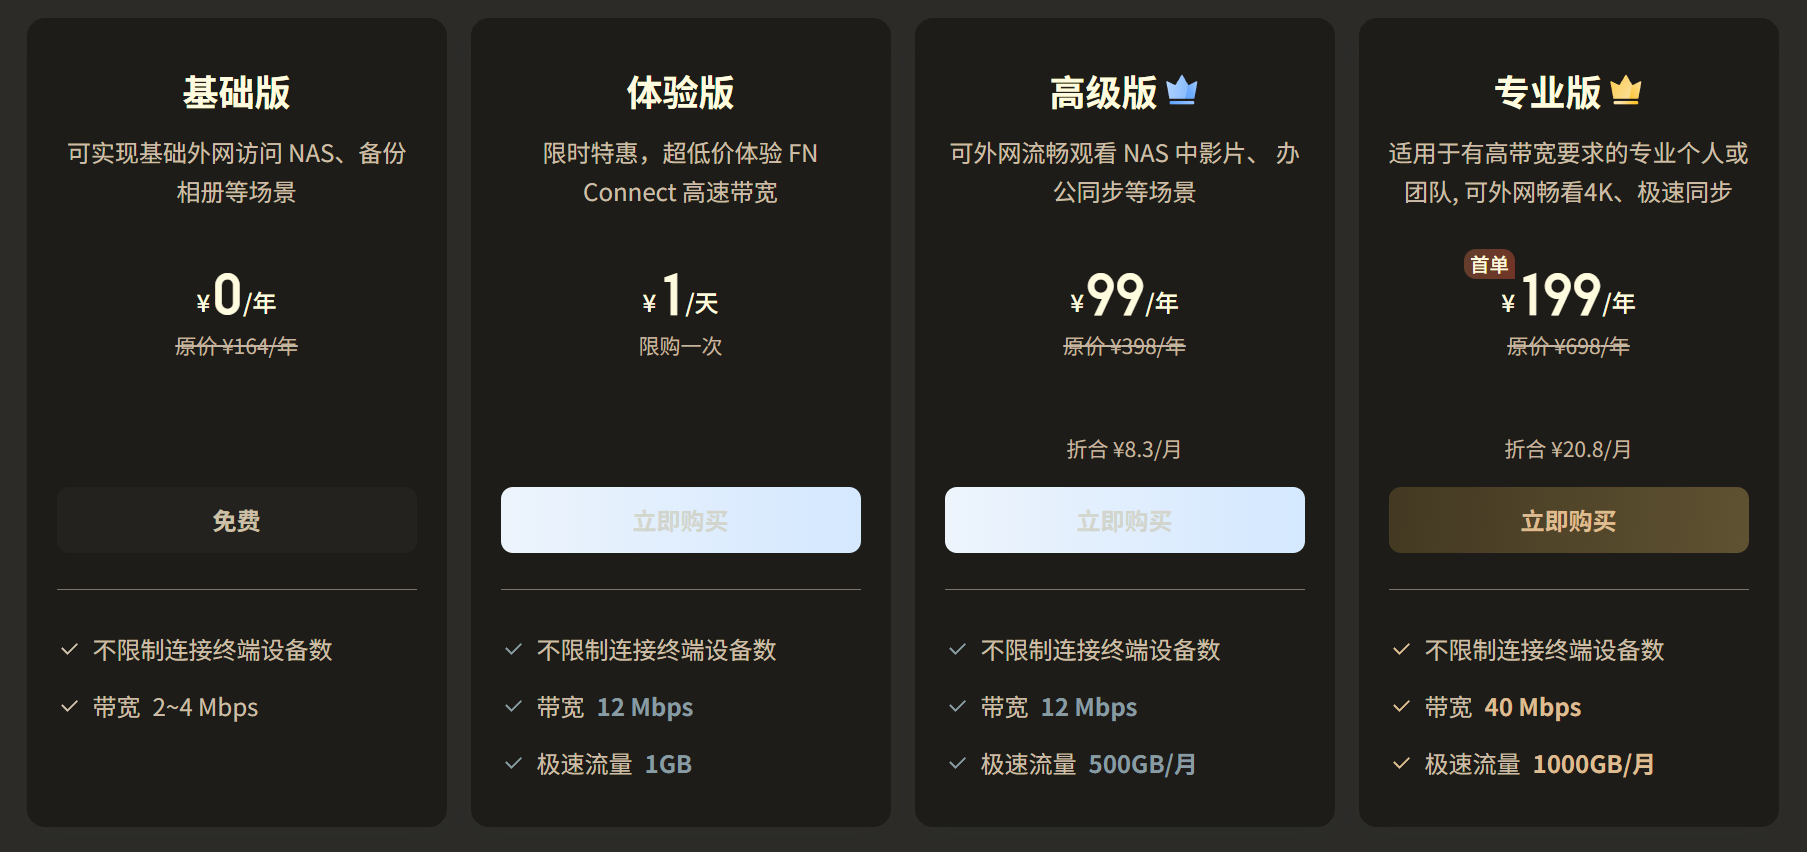
I find the 2-4Mbps speed tolerable, but 12Mbps is clearly more suitable for daily use. However, the price for 12Mbps is slightly higher than purchasing a VPS. In fact, I already have a 1C1G VPS located in Hong Kong that can fully utilize my upload bandwidth for daily use, not to mention download speeds.
Choosing a Intranet Penetration Solution
After deciding not to use Feiniu FN Connect, I began considering which penetration solution to use.
Typically, there are three options:
- Those with a public fixed IP can use DDNS penetration solutions from major providers like Tencent, Alibaba, or Cloudflare.
- Use your own VPS to set up an FRP channel for penetration.
- Use third-party penetration solutions like Cloudflare Tunnel, ngrok, or Tailscale Funnel.
Since I don’t have a public fixed IP at home—I couldn’t even enable IPv6 (refer to: “Why Is Enabling IPv6 So Difficult for Home Broadband?”)—I had to either set up FRP on my own VPS or use a ready-made third-party penetration solution.
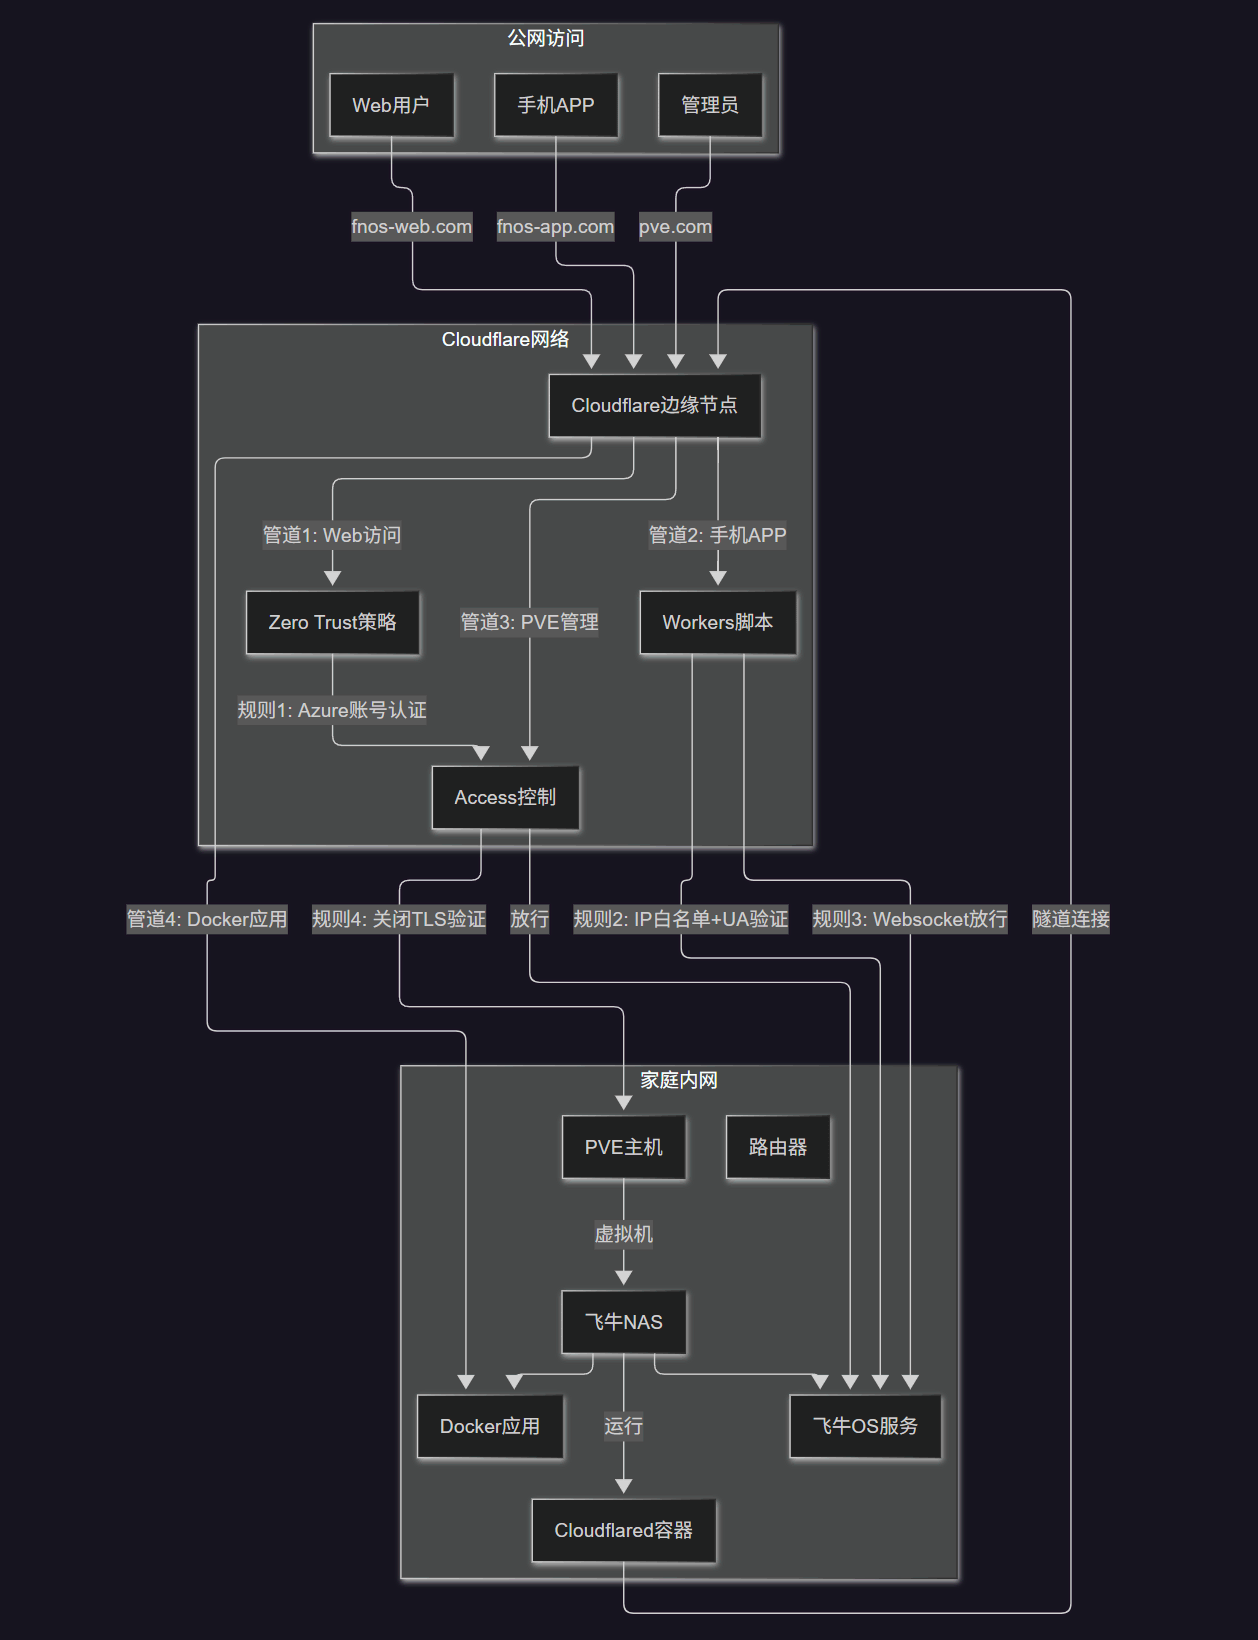
Ultimately, I chose Cloudflare Tunnel, primarily for network security reasons.
The specific plan is as follows:
Installing Cloudflare Tunnel in a Virtual Machine
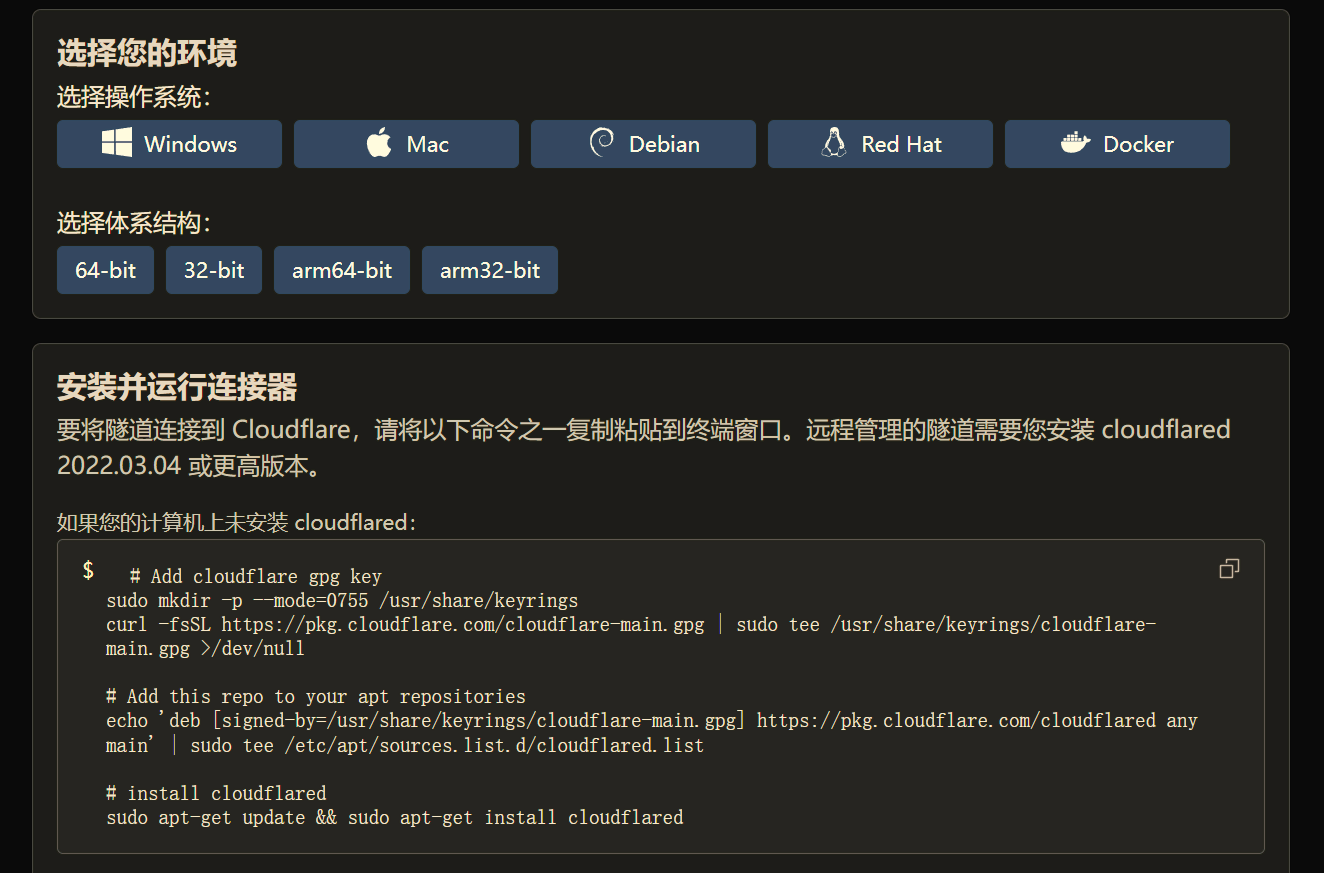
Cloudflare Tunnel offers multiple installation methods. Choose the one that suits your situation. The Docker version can be installed within Feiniu by converting the installation command into Docker Compose format.
For example:
| |
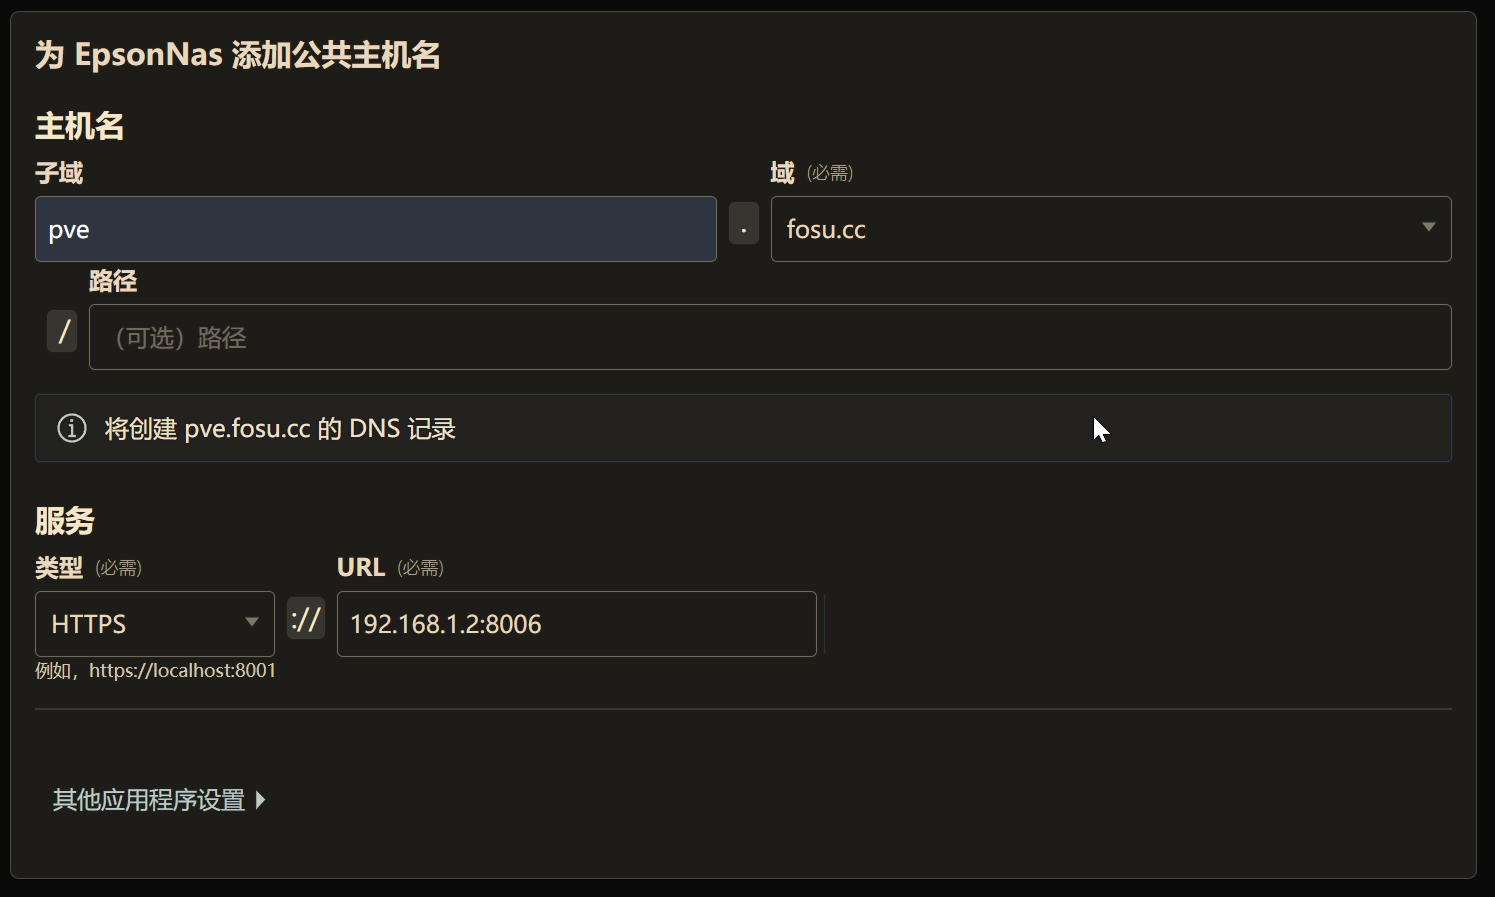
Adding a Tunnel
After installing Cloudflare Tunnel, add a public hostname and enter the intranet address to establish the connection.
Note: For services like Feiniu OS, you can add both HTTP and HTTPS. Once added, they can be accessed normally over the public network. However, the PVE management panel can only be added via HTTPS and requires disabling TLS verification in the application settings to open properly.
You can also add other services at home to Cloudflare Tunnel, such as your router’s management panel or other NAS devices. The strength of Cloudflare Tunnel lies in its ability to expose all services requiring external network access to the public network through an encrypted tunnel with just one program installed on the intranet.
However, this also significantly increases network security risks.
Adding ACCESS Control
The Cloudflare suite of services can be applied to Cloudflare Tunnel, significantly enhancing the security of home devices exposed to the public network.
Based on daily needs, I find adding ACCESS application control most practical.
Currently, I use identity authentication for access.
In the Cloudflare Zero Trust homepage settings, add identity authentication information. Given the current network environment in China, it’s best to add an Azure account.
After all, Microsoft is relatively robust, and Azure can be accessed normally in daily network environments. Other options like Google or GitHub are prone to instability.

On the addition page, Cloudflare provides detailed instructions. Just follow the steps.
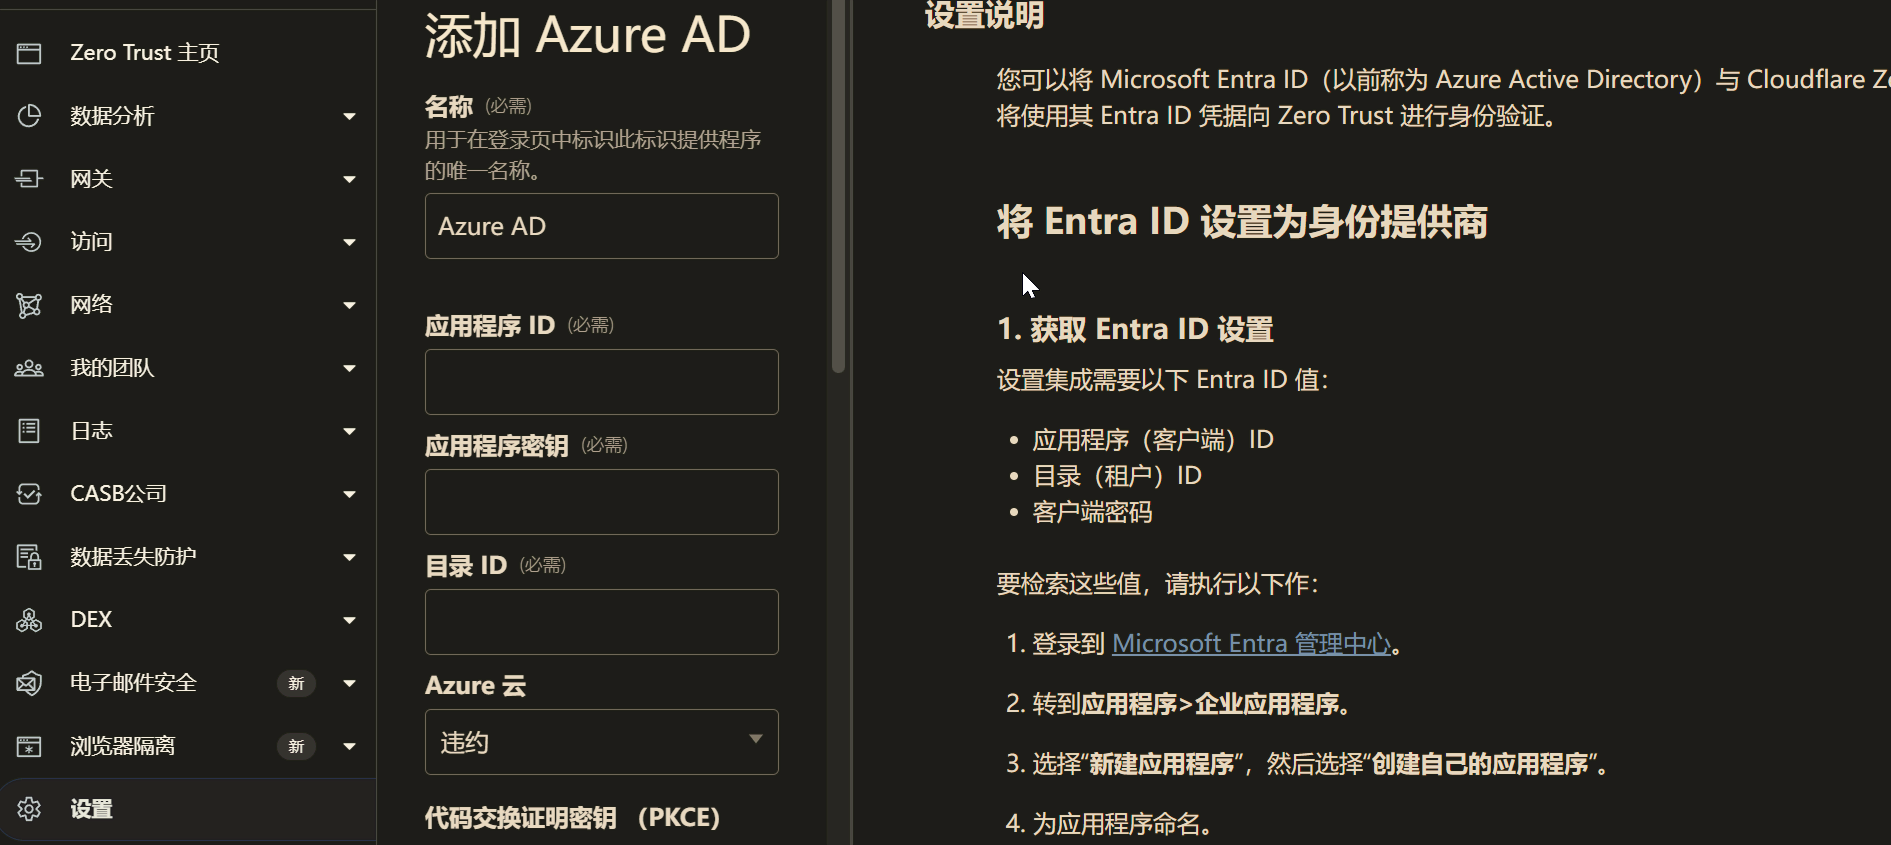
After adding identity information, add a policy in Zero Trust’s Access. Select Login Methods as Azure and Emails as your own Azure account email.
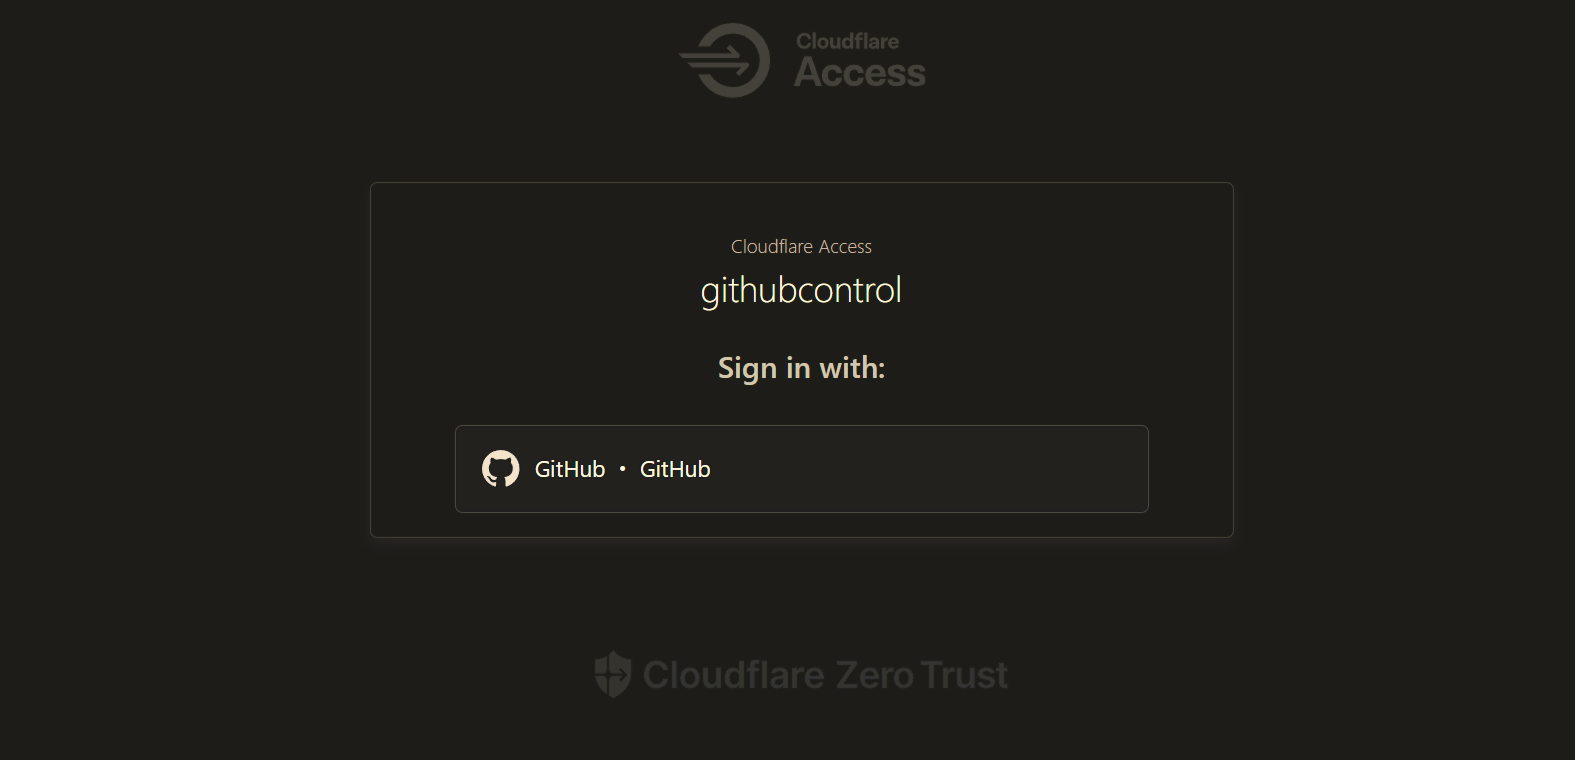
Then, add a self-hosted application in Access, select the hostname set earlier in Cloudflare Tunnel, and apply the Azure policy you just created.
This way, when accessing the Feiniu OS panel, the Cloudflare Zero Trust application interface appears first. Without logging in with your Azure account, it’s virtually impossible to access the Feiniu OS login interface.
Adding Access Policies for the Feiniu Mobile App
Daily use of Feiniu involves both the web version and the mobile app. The web version is largely unsupported by common mobile browsers, making it inconvenient. Although some say the Alook browser works slightly better, practical tests show it’s still problematic. Checking the Feiniu forum, I found that the official team has no plans to adapt to mobile browsers.无奈之下,只能继续研究飞牛手机 APP 登录问题。
The main issue is that after adding the aforementioned ACCESS control, the same address cannot be used to log in to the Feiniu app. The app cannot display a web page for Azure login. If the login command from the app doesn’t receive a response address, it automatically terminates.
This leaves only one option: create a dedicated access channel for the mobile app by setting up a new tunnel in Cloudflare specifically for the app. Then, use Cloudflare’s access policies to restrict it.
For example, the simplest method is to set IP rules. If you consistently use certain IPs to connect to Cloudflare, you can block all connections not from those IPs.
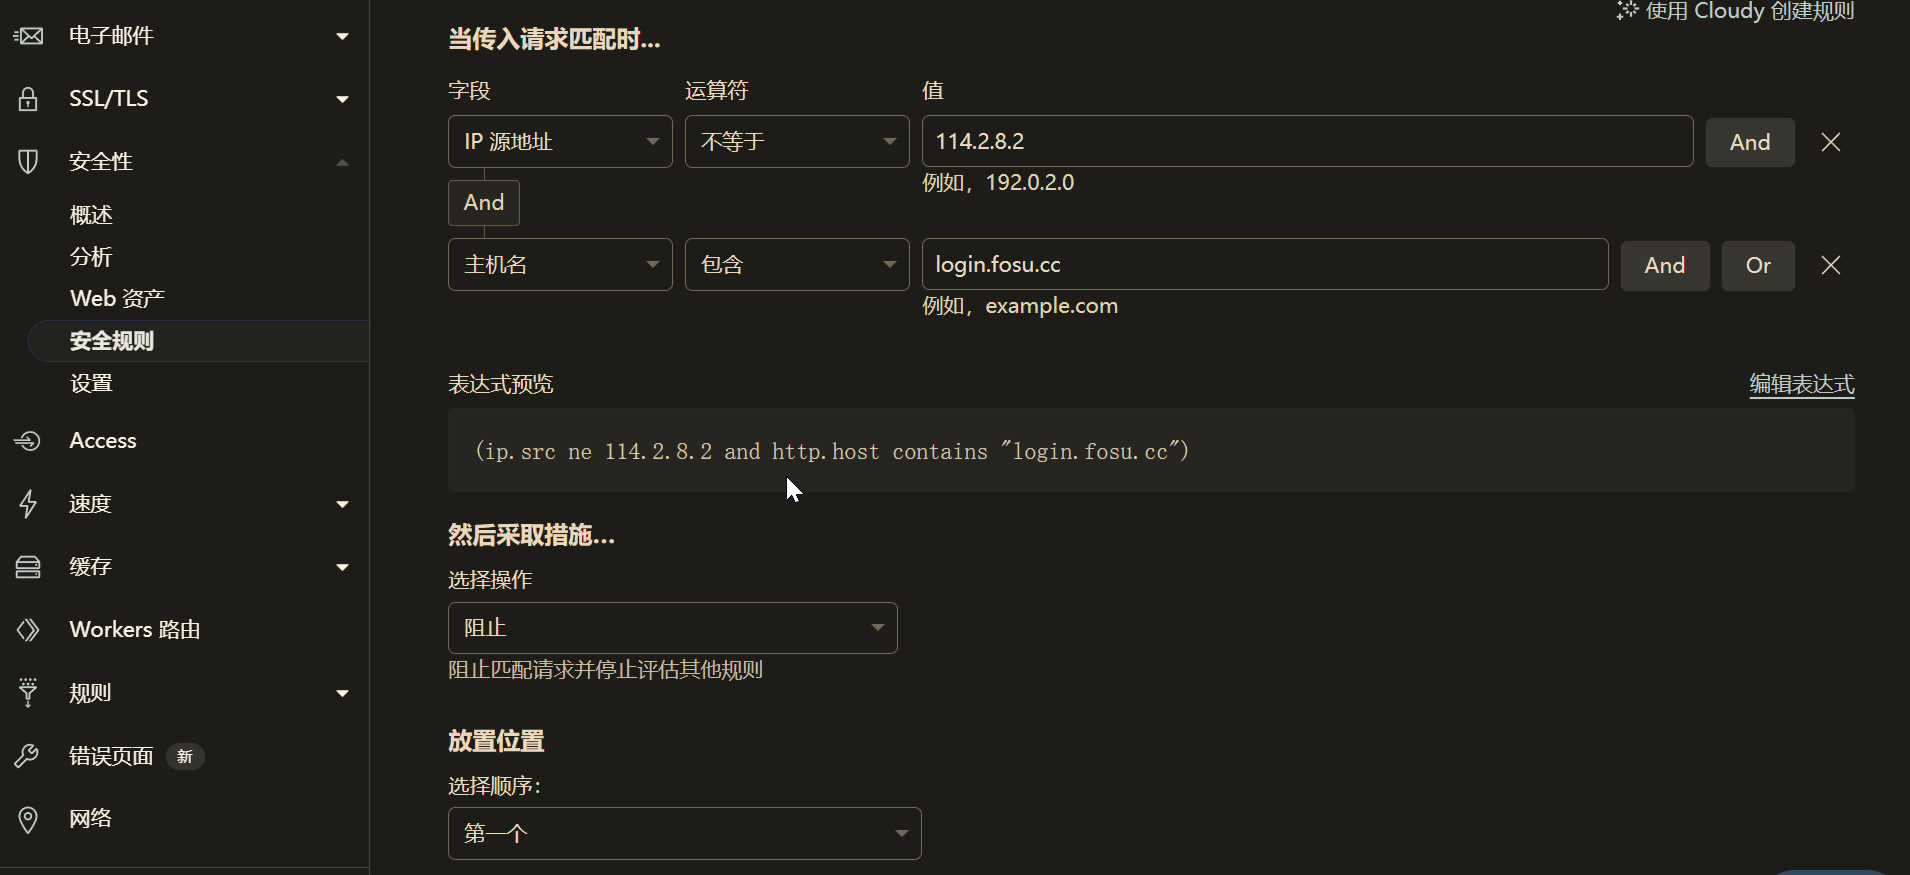
Considering that I sometimes use fixed IPs and sometimes don’t, setting security rules became very difficult. Eventually, I chose to use Cloudflare Workers to control connections.
I set up two access control logics:
- Automatically allow access from IP whitelists.
- Multi-factor authentication for Host headers, including reviewing the IP segments used by the app, User-Agent, TLS version, ISP, lines, etc.
The specific Workers content is sensitive and won’t be shared here. If needed, you can ask AI to help write one. Generally, it will pass on the first run. Note that after verification, you must allow WebSocket, otherwise the photo gallery in the app won’t open.
During the process, I spent a long time折腾 device-fingerprint authentication, only to later discover that this is an enterprise-only feature. If device fingerprint ID authentication were used, it would likely be one of the most secure methods.
Additionally, there’s a minor flaw in this solution: Docker applications cannot be opened within the app.
Since I only have a few applications, I set up a separate tunnel for each to the public network, which doesn’t bother me. If you prefer opening Docker applications within the app, I recommend adding each application to the tunnel and reconfiguring the external network address for each in Docker.
In summary, this access control strategy significantly reduces the risk of public network exposure. In the future, I may consider using Cloudflare Warp for connections, further enhancing access security by setting up firewalls and resolution policies.